Domain Settings
NOTE: We recommend you do these steps at the end of setting up your school
Before you start, please consider these points.
-
Configuring the domain, can be slightly tricky if you have a non-technical background. If you are not sure or face any trouble doing this yourself, please open a ticket for us so that we can assist you in configuring the domain.
-
Once you have configured a domain, application of SSL can take up to 24 hours. After 24 hours, please if you still see your website as not secure, please open a ticket for us.
-
Please open a support ticket for us from your Instructor portal (after login) to get help.
-
For ReviewNPrep Marketplace Instructors - support ticket
-
For ReviewNPrep.io Instructors - support ticket
You can connect your own purchased domain to your ReviewNPrep school in 3** steps**:
Step1: Create a CNAME record for your subdomain.
Step2: Check if the CNAME record is successfully added.
Step3: Enter the domain name in your ReviewNPrep admin panel.
Step4: Enable domain forwarding for naked domains.
Step#1 - Create a CNAME record for your subdomain.
-
Sign in to your domain registrar's control panel.
-
Look for the option to change DNS records. The option might be called something like DNS Management, Name Server Management, or Advanced Settings.
-
Before entering a new CNAME record, deleting any existing entries for CNAME or A Record, you may want to copy any content, currently at that address, securely. This can come in handy for troubleshooting if something goes wrong.
-
Locate the A record for your domain. If there is an existing A record, you will have to delete it to have your domain point to our server.
Create a CNAME record.
The **Host/**Name/Alias will be the part of your domain that appears before the naked domain. For example, if your naked domain is yourschool.com and you want to create the subdomain www.yourschool.com, the Host/Name/Alias should be set to www. 2.
The CNAME record Value/Destination/Point should point to your ReviewNPrep school URL (e.g. yourschool.ReviewNPrep.io).
NOTE: BELOW ARE ADDITIONAL INSTRUCTIONS AND SCREENSHOTS TO CHANGE DOMAIN SETTINGS BASED ON YOUR DOMAIN HOST.
- Make sure to replace yourschool.ReviewNPrep.com with your ReviewNPrep school URL.
- Do not include the https:// before your ReviewNPrep URL or the / after.
- If you use GoDaddy, you can check the steps here.
- If you use Cloudflare, you can check the steps here.
- If you use Dreamhost, **Bluehost or ****Namecheap **you can check the steps here.
Step#2 - Check if the CNAME record is successfully added.
1. Go to Google Admin Toolbox.
2. Insert your subdomain free of https:// or / at the end (e.g. www.yourschool.com).
3. If the CNAME record is correct, the ReviewNPrep school URL will appear in Target.
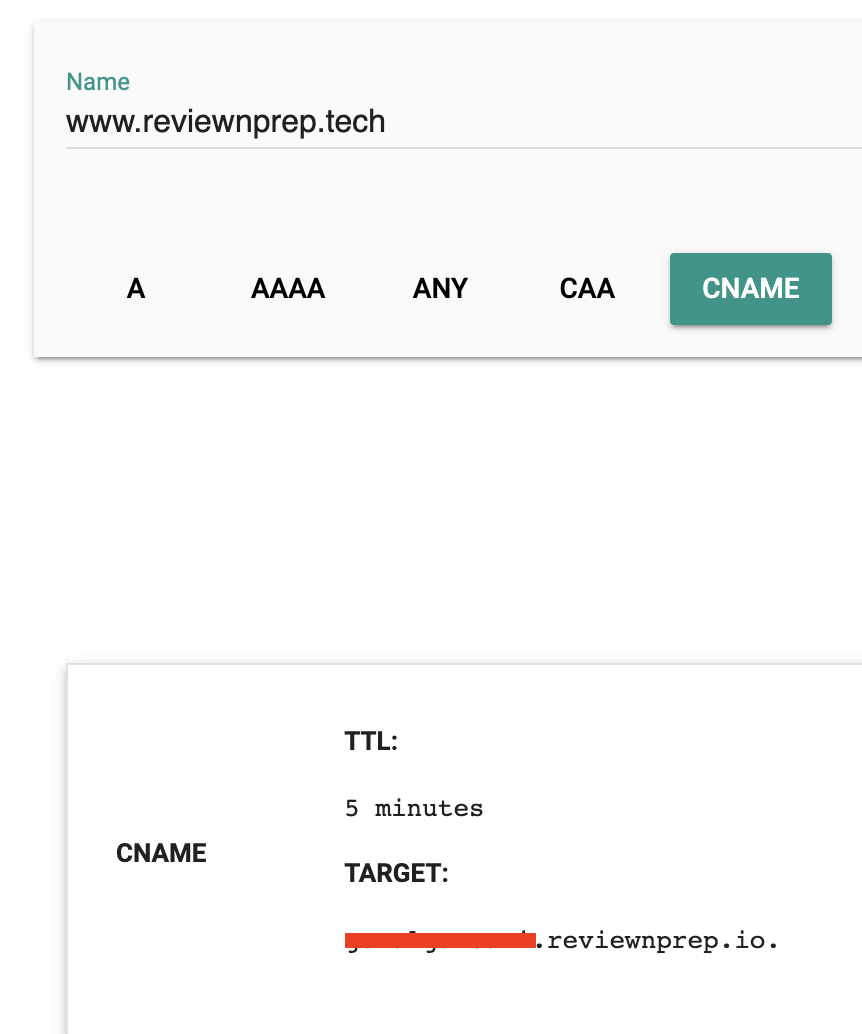
If the CNAME record has not been successfully added and you view a message such as "Record not found", please open a support ticket for us from your Instructor portal to get help.
Step#3: Enter the domain name in your ReviewNPrep admin panel (Old Instructions)
NOTE: We've moved the domain option in the reviewnprep.io panel under domain setting. Refer 3.1 below.
- Go to Domain settings when you are logged in your admin panel.
- Enter the domain name you wish you use. If the DNS settings are not right, domain will not be pointed. So, please make sure you have the settings right.
- Once you have the domain entered, click on Verify Domain.
- Once the domain is pointed, SSL will be automatically applied on your domain. This might take between 1hr - 24hours.
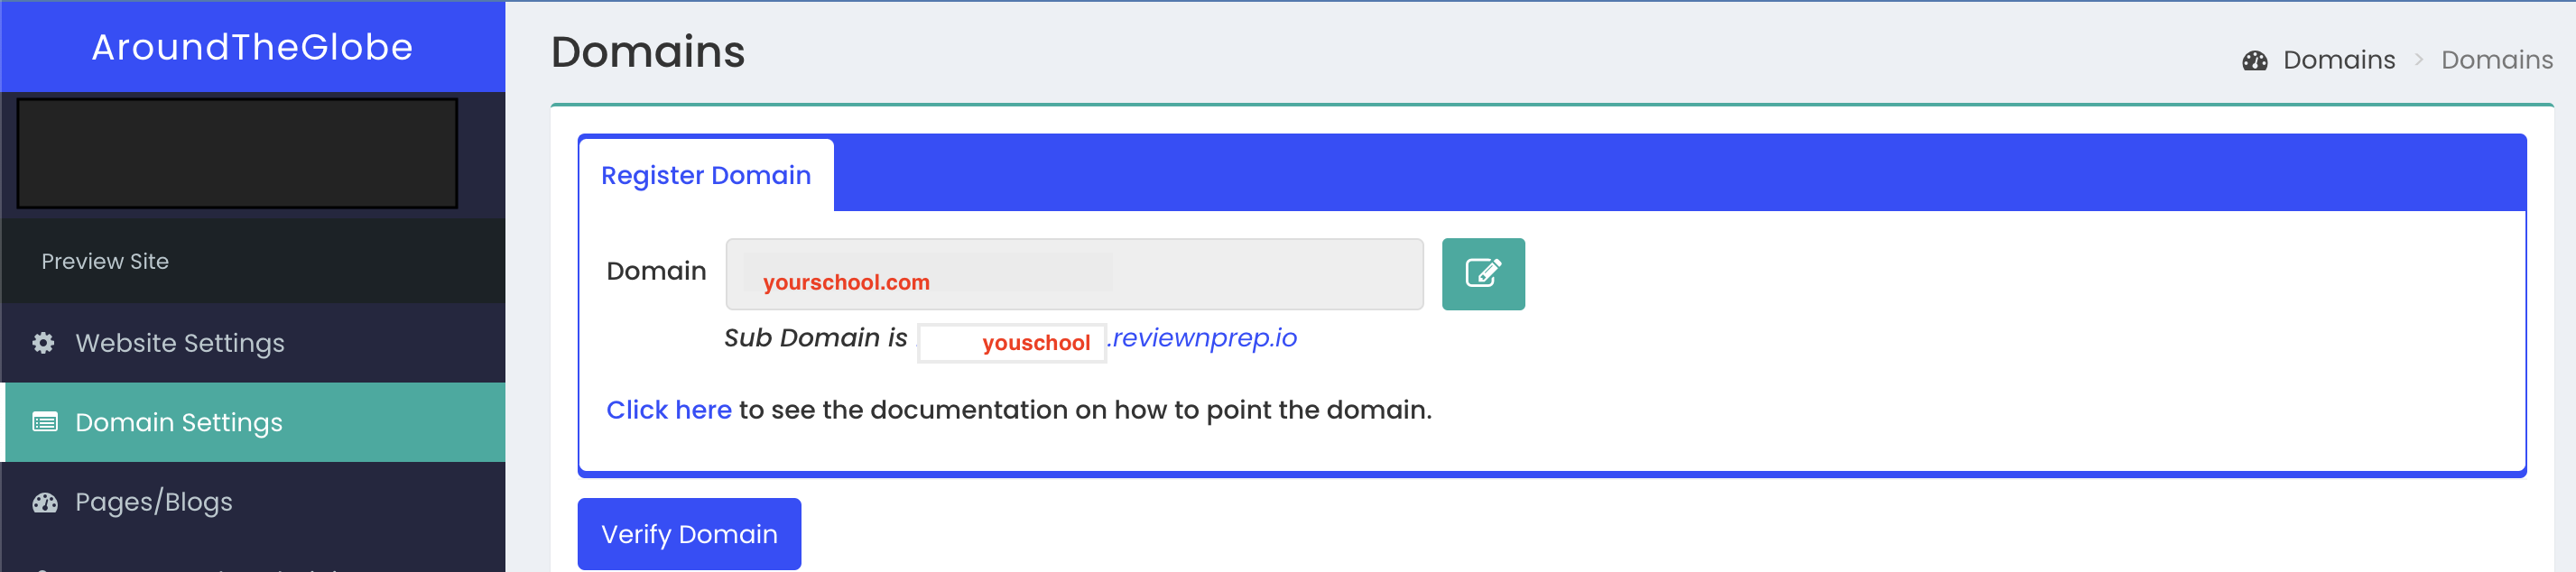
Step#3.1: Enter the domain name in your ReviewNPrep.io menu panel (New Instructions)
- Go to Domain settings when you are logged in your reviewnprep.io panel.
- Enter the domain name you wish you use.
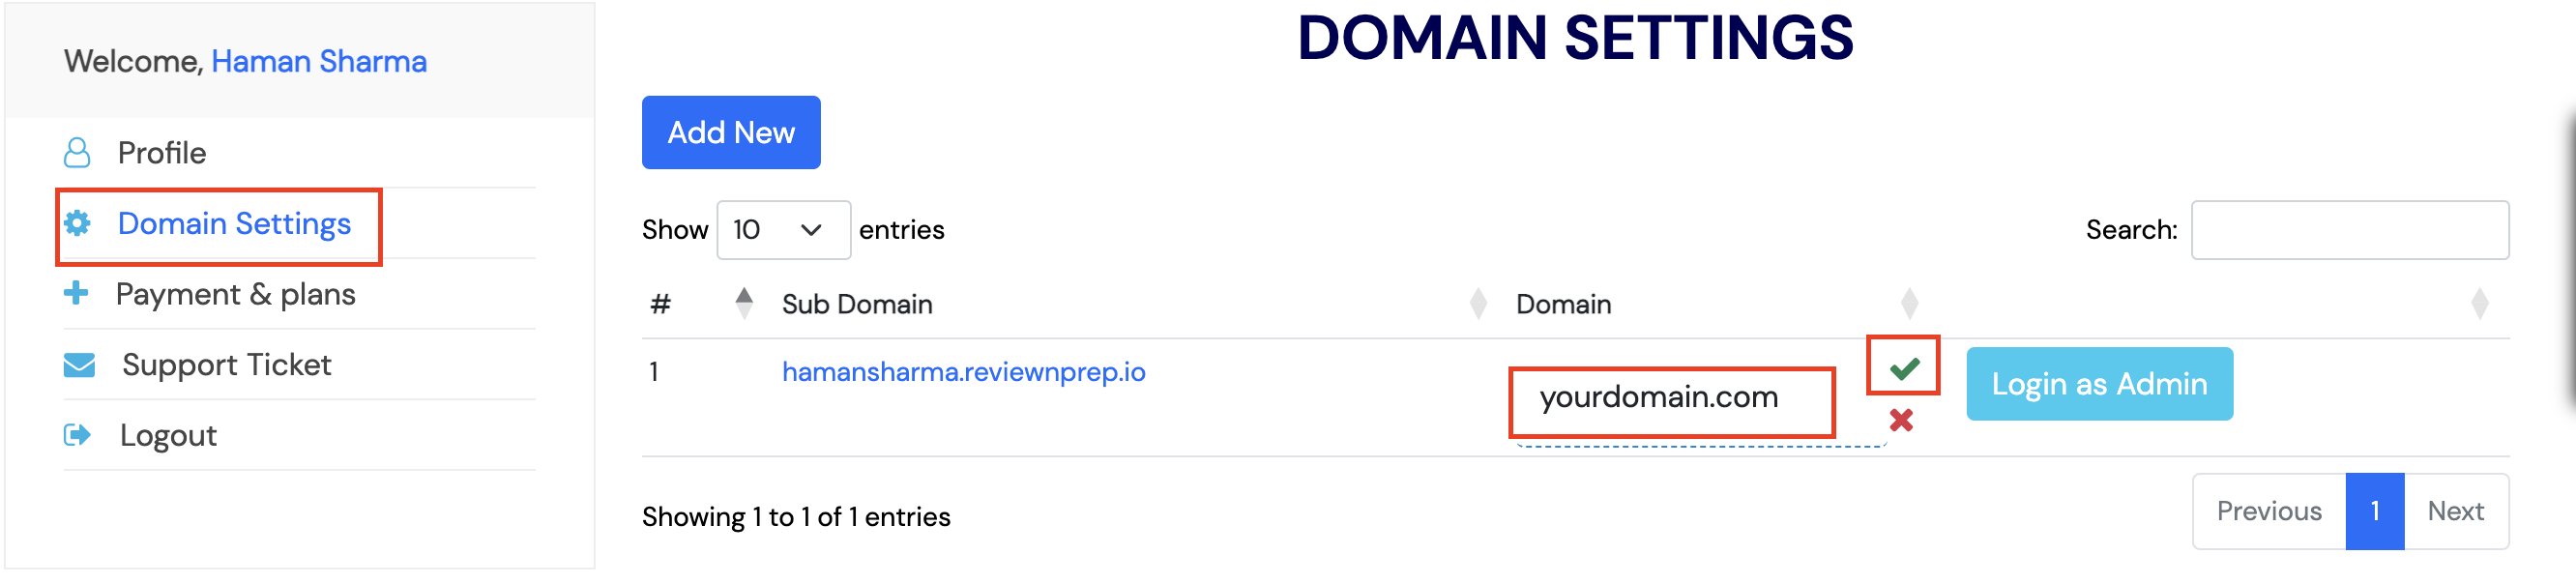
- Once you have the domain entered, click on the checkbox.
- If the DNS settings are not right, domain will not be pointed. So, please make sure you have the settings right.
- Once the domain is pointed, SSL will be automatically applied on your domain. This might take between 1hr - 24hours.
Step#4: Enable Domain Forwarding for Naked Domains
There are multiple ways to enable Domain Forwarding. One of them is using your own Domain hosting and other being using CloudFlare. Some domain hosting providers do not offer forwarding and for those cases you can use CloudFlare. For CloudFlare, check the instructions here.
If you are using your own domain hosting provider, example GoDaddy, Hostinger, Namecheap etc, below are general guidelines on how to achieve this:
-
Login to your Domain Hosting provider.
-
Search for option "Subdomain Forwarding".
-
Add a permanent forwarding (301).
-
An example setting from ReviewNPrep.org is shared below:
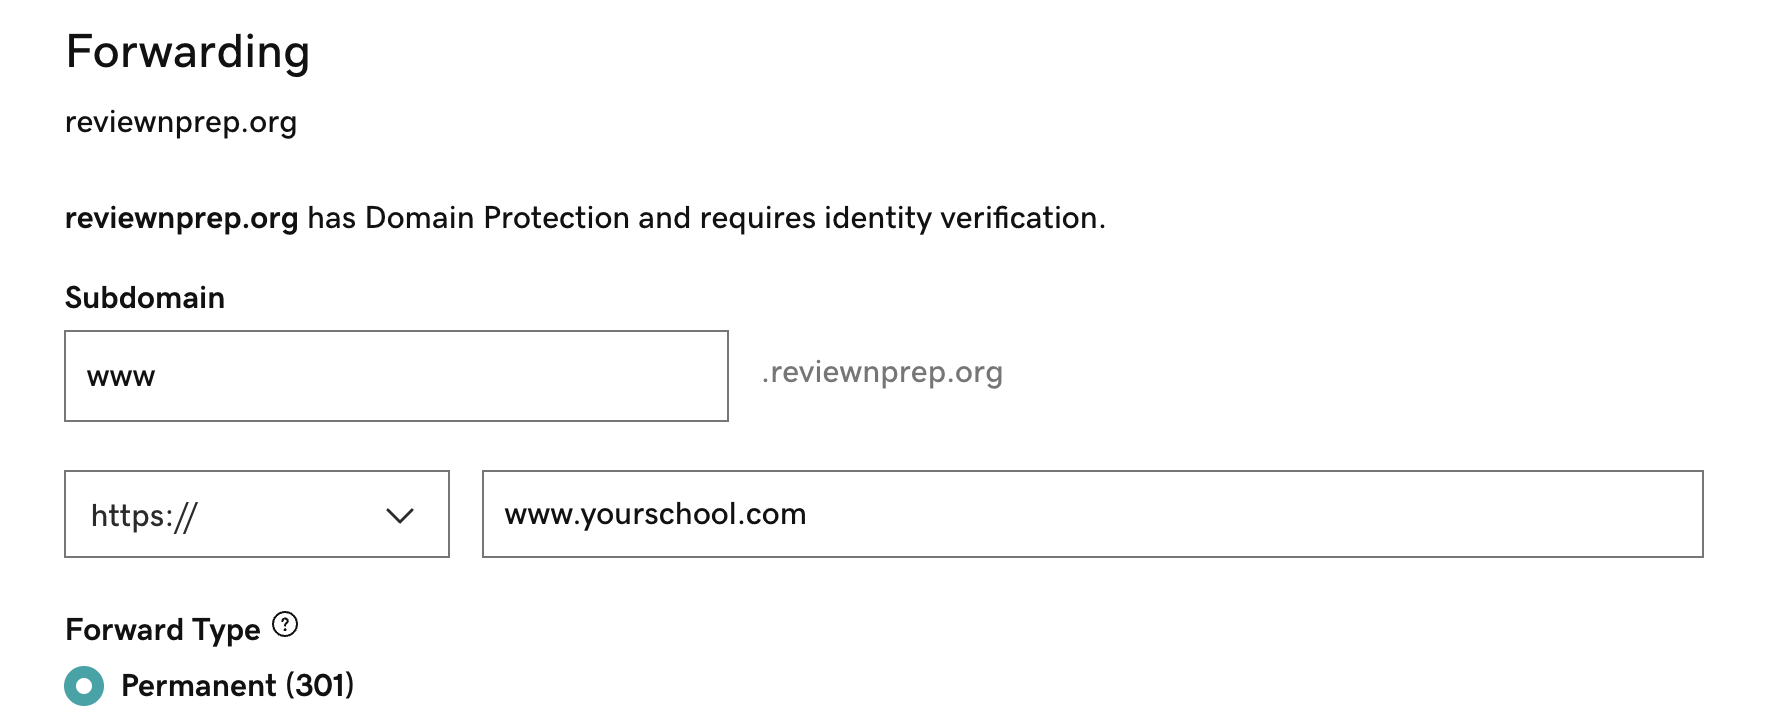
Change the www.yourschool.com to your website name.
As always, if in doubt, please contact us to help in changing the settings.